
Don't have a camera to align patterns, or maybe you just like to have options for pattern alignment? Basting boxes are a secret weapon. See how to use them when you are quilting projects in the hoop!
Earlier this month, we discussed how basting stitches contribute to better embroidery. Today, I am going to show you how you can use basting stitches to help line up projects that you have to hoop multiple times, like quilting motifs.
Basting boxes are one of the most visual ways to ensure your designs are going to stitch exactly where you want them.
A couple of years ago, I was asked to participate in a Farmhouse Sentiments stitch-along sponsored by Baby Lock and Designs in Machine Embroidery. One part of the wall hanging used woodgrain designs. I decided to use them to quilt my borders, requiring six total hoopings. That can be a nightmare, especially since the woodgrain designs are nested against one another.

I started by positioning and combining three of four woodgrain designs for my largest hoop using Embrilliance software.

Stitch a basting box of the combined woodgrain design on the stabilizer. Remove the hoop and stick thumbtacks up from behind the hooped stabilizer at the top and bottom corners that butt up against the inner seam of the border. Press the top inner edge of the border, at the seam, over the top thumbtack. Smooth the border out and push it over the second thumbtack.

Secure the border in the hoop with spray adhesive and remove the thumb tacks. Now, put the hoop back on the machine and baste the design to the hooped stabilizer. If it is straight, stitch out the rest of the embroidery. If not, just clip basting stitches and start over.

The basting box allows you to see if your initial hooping is straight before you stitch.
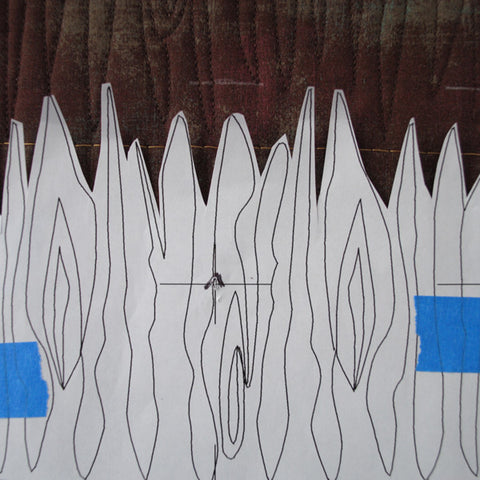
Since the edges of the woodgrain designs were jagged, the basting box also helped me see if I had the next set of woodgrain aligned properly when it was time to stitch the fourth woodgrain section.

Rotate and continue along the next border.
Keep the basting boxes in place until the piece is done. It helps keep the fabric and batting from shifting.
Debbie Henry
Sew Inspired by Bonnie
Debbie Henry - October 31, 2022
Thanks, Sharon! I’d love to have a camera on my machine!
Debbie Henry - October 31, 2022
So happy that you found it useful, Bonnie!
Bonnie Hardman - October 26, 2022
Thank you for posting this wonderful tip. I was very easy to understand and I am getting ready to work on some ith quilting and this information couldn’t have come at a better time for me. Thank you.
Sharon L Kesner - October 26, 2022
I really enjoyed reading about your method. I have done quite a bit of this sort of thing and do similar with the camera. Your method is a great way to get things to line up properly.